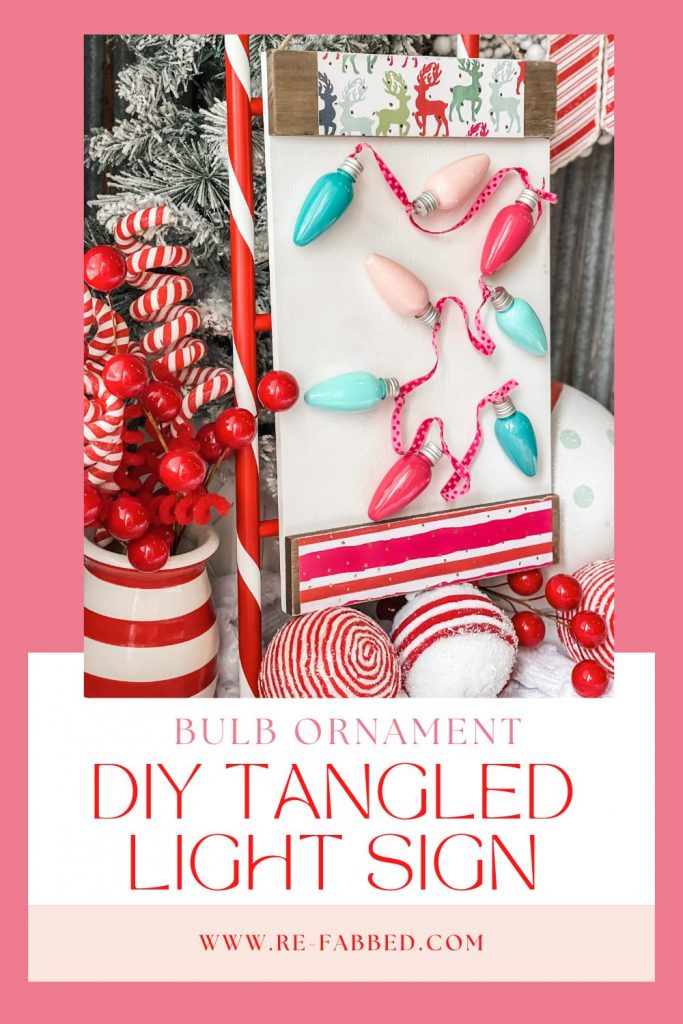
I love a good Christmas light project! THIS one is perhaps my very favorite one to date! Let me show you how to take some plastic bulb ornaments from Hobby Lobby and turn them into a festive and fun Christmas light sign!
Supplies Needed:
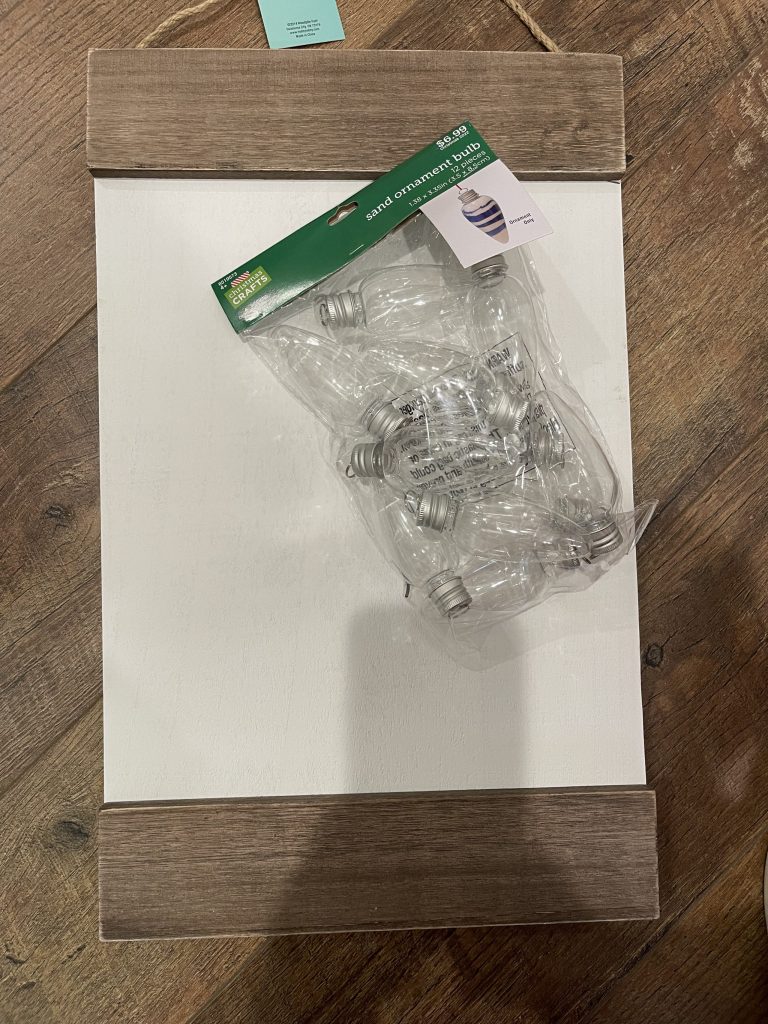
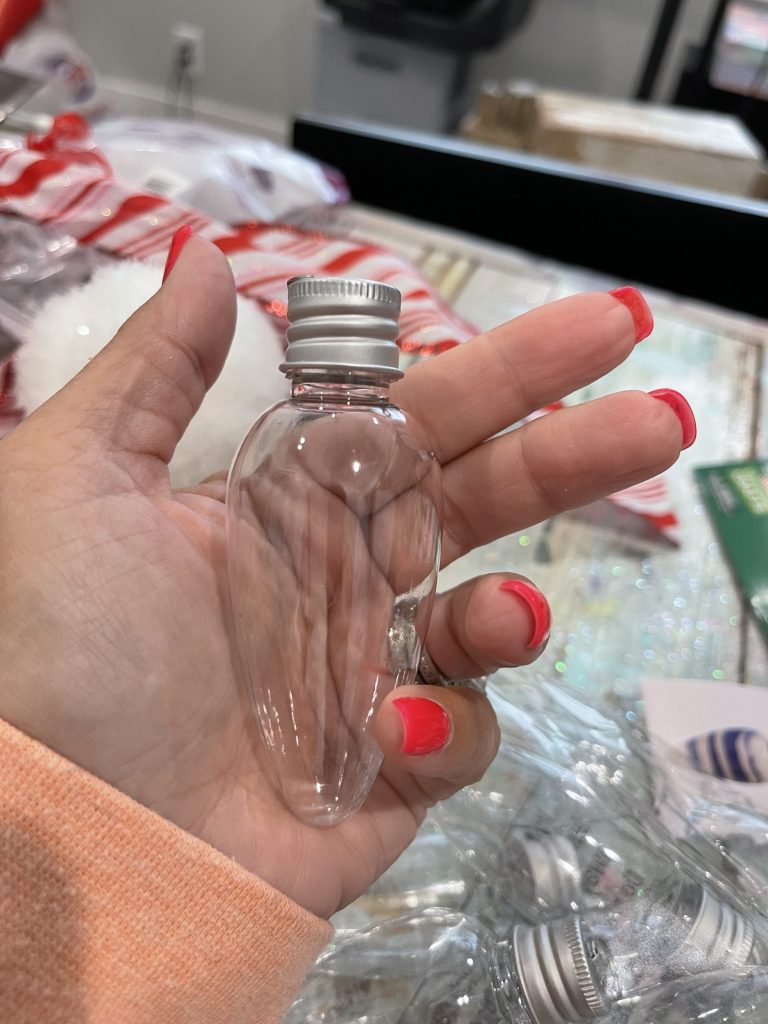
pack of clear plastic bulb ornaments from Hobby Lobby or other craft store
acrylic craft paint (any colors you choose)
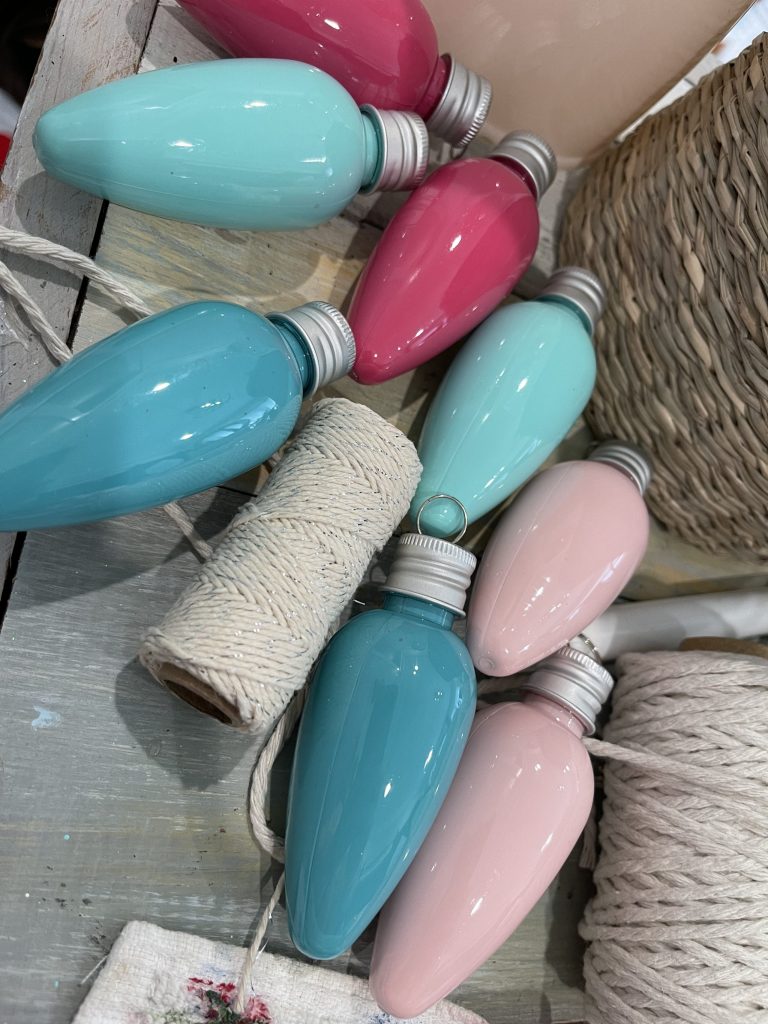
-I used cameo pink, fruit punch, key west and laguna from Apple Barrel
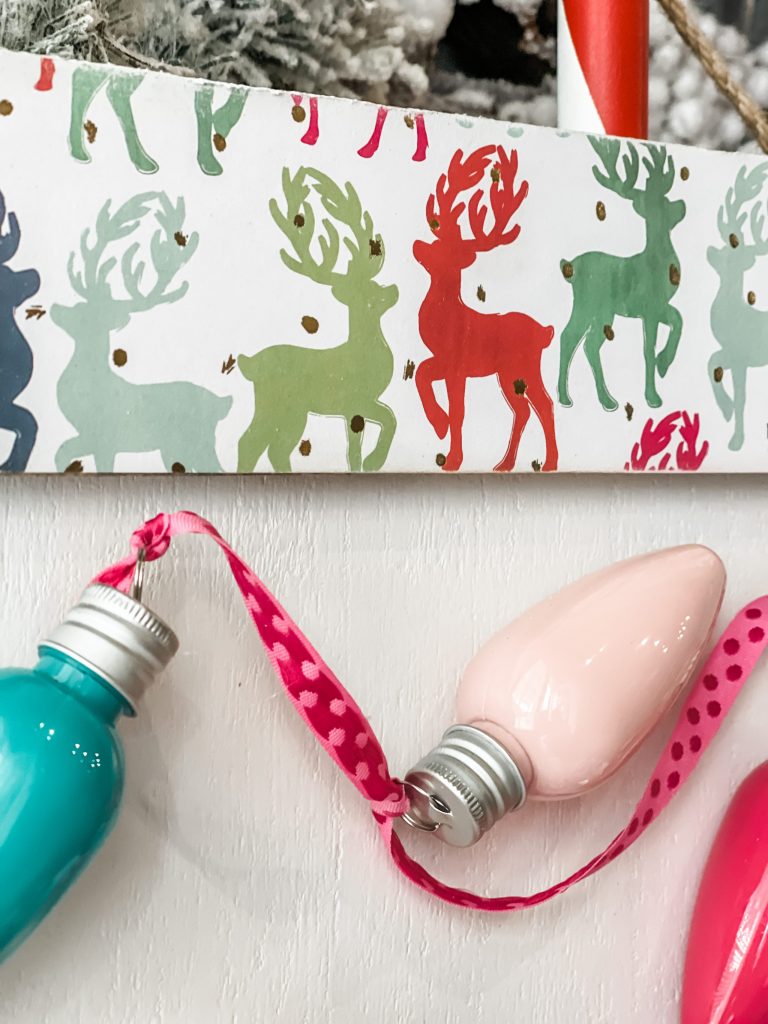
wooden sign from Hobby Lobby (you can do this on ANY sign)
scrapbook paper of your choice
mod podge
paint brush for mod podge
ribbon or twine for light strings
hot glue gun

Now, let’s get started!
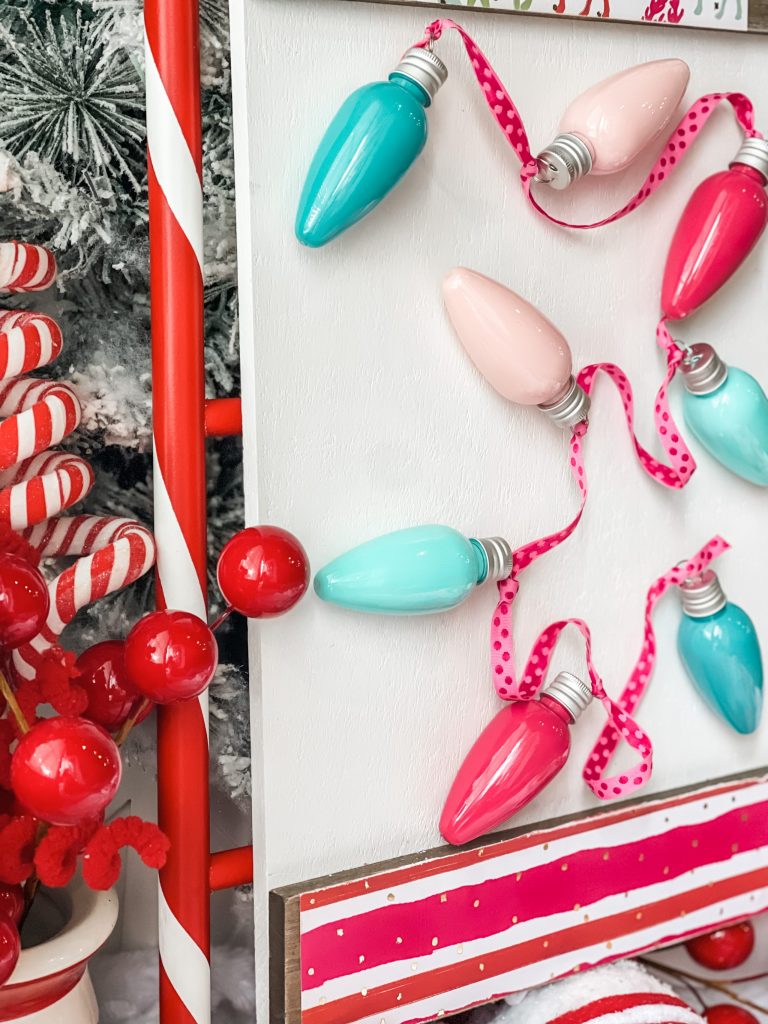
First, I picked my paint colors for my color pallete. I wanted to match my “candyland” theme, so I went with pinks and aquas!
After that, I figured out about how many bulbs would look right on my sign. I decided on 8, so I took my 4 colors of paint and painted 2 of each color!
This was an EASY PROCESS!
I took the clear bulb and poured a little bit of paint into it. I just squeezed it in! It was maybe about an inch or so worth of paint.
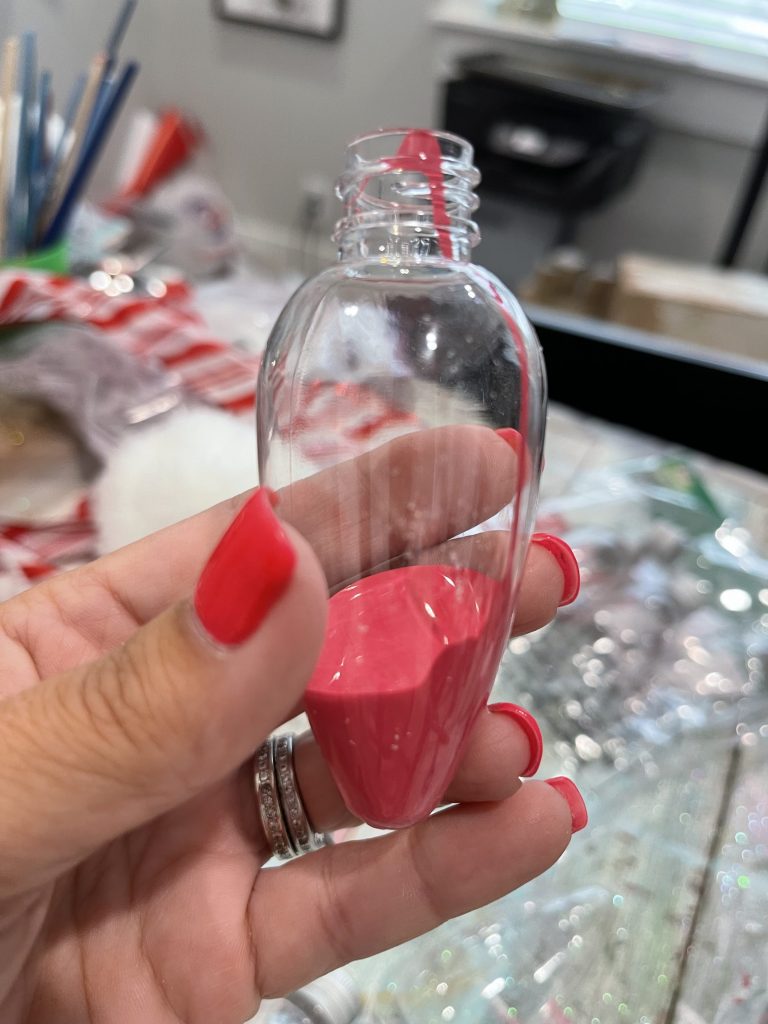
I put the top back on and shook it up! With a few shakes, the paint covered the entire inside of the clear bulb! They looked SOOOOOO good. I will be doing this for many projects, yall. SO SO easy.
Once I had them all painted up, I added ribbon. I basically threaded it through each bulb and then laid the bulbs onto the sign, trying to place them where I thought they looked best. Once I figured out where they would go, I put a small dab of hot glue on the sign and placed the bulb on it. It doesn’t take much glue!
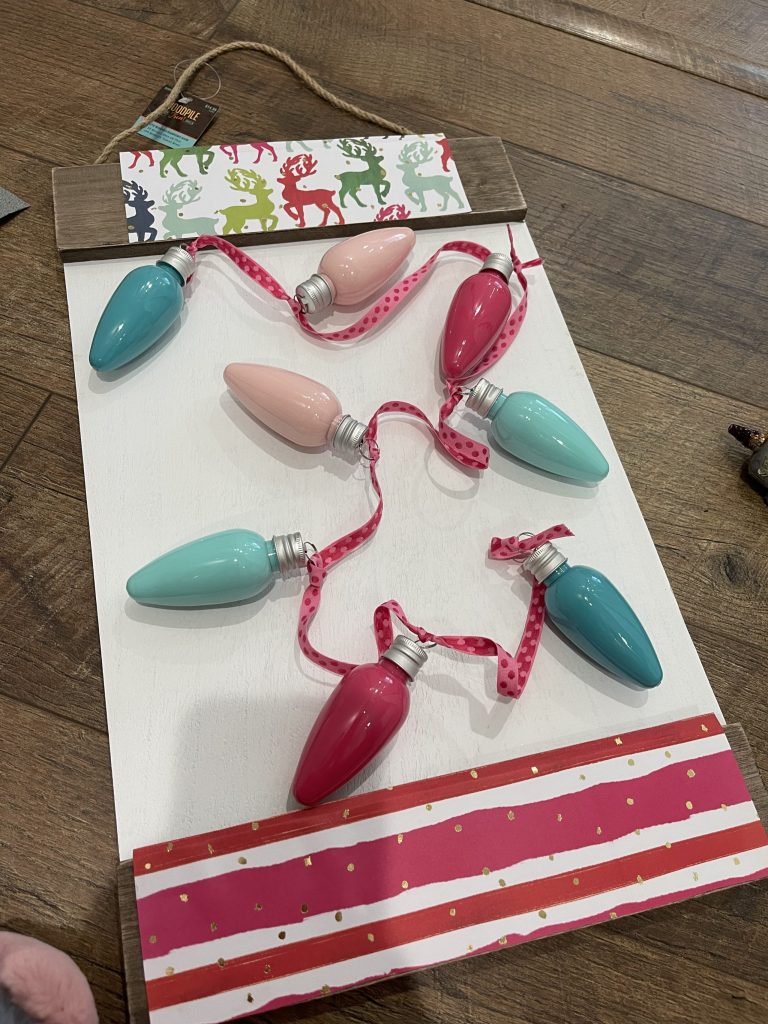
Once you have that done, you are ready for the top slats IF you want to do this part or IF your sign has this area!
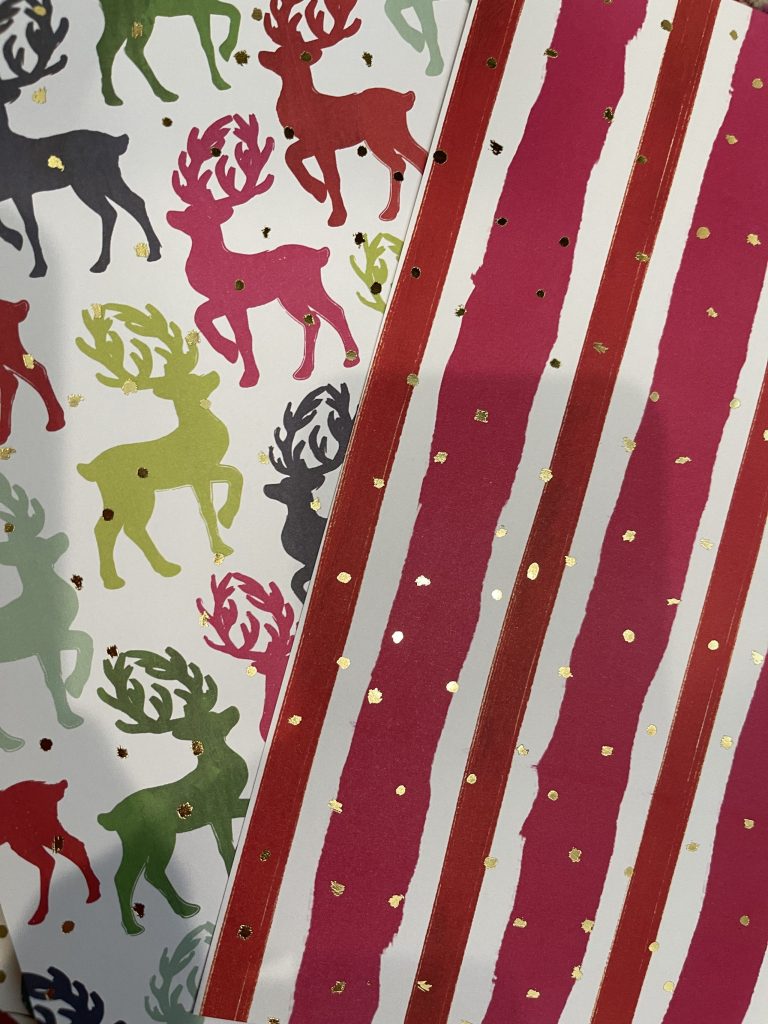
I simply got some scrapbook paper (mine is from Hobby Lobby) and arranged it where I wanted it to be and cut it to fit. I still wanted some of the wood to show, so I didn’t cover it completely. I then took my mod podge and painted it onto the back of my paper and laid it onto the wood…being sure to not have any dreaded BUBBLES. And guess what? I didn’t have a single one! Boo yah!
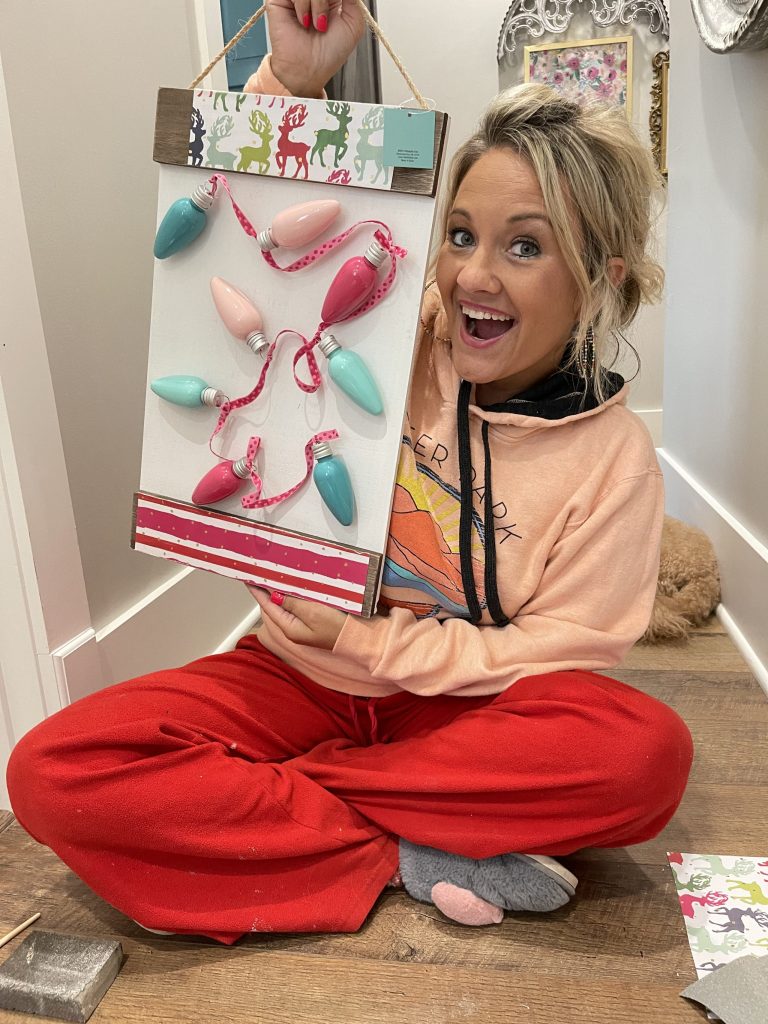
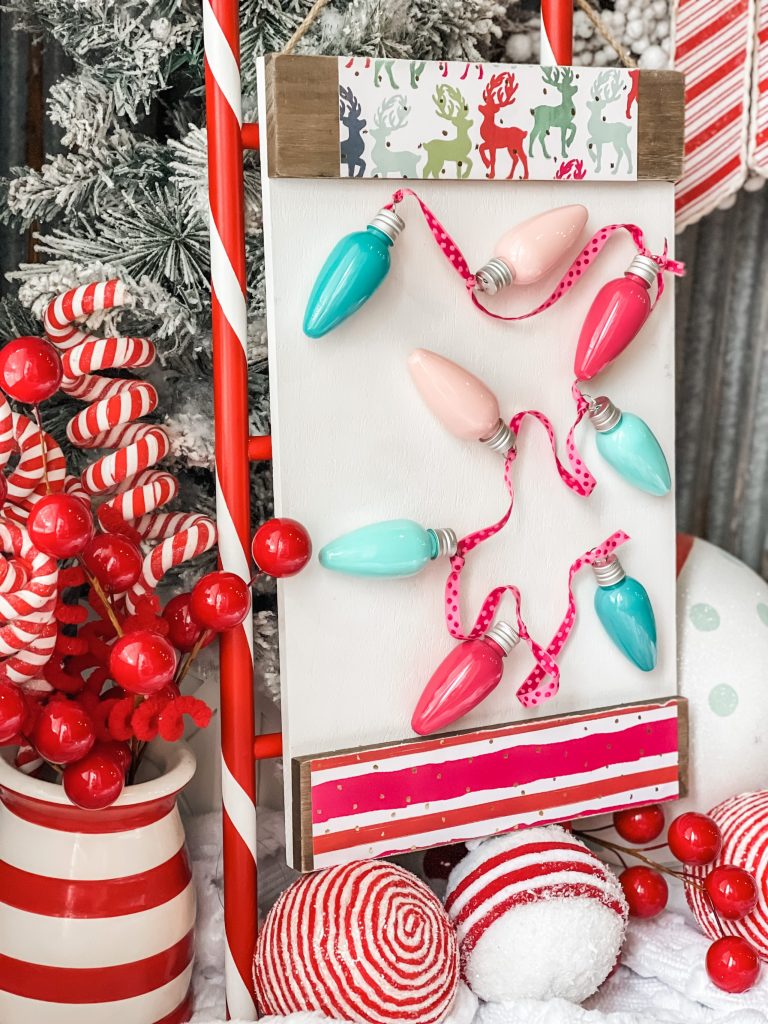
ALL DONE!!!! I seriously LOVE THIS PROJECT!!!!!
Be sure to PIN FOR LATER!
Last Updated on July 28, 2022

I have made the round glass ball ornaments with paint in them several years now. Some of them I put 2 colors in them and shake them up gently (have had a few shatter on me) and swirl the paint around. Turn them upside down in an open egg carton for the excess paint to run out and dry and tie a ribbon on it to hang it from the tree. They turn out SO pretty and each one different.
Absolutely LOVE the colors and watched you so something similar with the colored bulb pick from Walmart! Ready to decorate for Christmas now!
The colors that you utilized are truly gorgeous. This is an awesome idea.
Love the bulbs and the colors you chose .
Great color combination!
I have tangled lights every Christmas but they never look that cute.
Super cute! I love the colors.
Your creativity continues to amaze me! Love the color choices for this cute project!
I loved these when I seen you making them!
Great project. I have glass round ornaments for my tree that I made years ago. Same concept with the paint, except each ornament has 2-3 colors which are swirled. I like the light bulb shaped ones too!
Your instructions are very clear – thank you so much
That is precious and so unique. Making a trip to Hobby Lobby tomorrow!
Oh what a great idea. Adorable little Christmas sign. Love it so much!
I ???? Christmas lights. That’s the only reason I want to go to Vegas ????
Merry Christmas to you and your family Brooke ????
Totally making this! So cute!
Love this, Brooke! So simple and easy. That’s what I like!
I always wonder what I can make with those light bulb ornaments…so this is perfect!! Thanks for the inspiration!
What are great idea!
Could you use leftover nail polish as a substitute for the paint? Good way to use up colors you no longer want!
Another I may change up a bit and make it gingerbread
So so cute. I love the colors you chose!
I’m trying this ????
Cute
Great idea! It turned out great!
I am getting excited about Christmas coming! Such great ideas!
I love this! I really need to make this asap! Love all the colors you chose ????
I tried this project and loved it! Easy, quick and turned out so cute!!
I love the colors!
This is perfect for the holidays
This has always been one of my favorites!
Sooo cute!
Love these colors together!
Too cute I love the look
Just inspirational. My favorite. Christmas light sign. ????
Beautiful colors that inspired me to try this paint techniques with bulbs for a tree. Thank you
Super cute!
I think this is so adorable
I was going to make this last year and never got to it but I will definitely make this year with my grandbabes
I love this!
Cute & whimsical! I have done the ball ornament for fun but definitely not for something this cute.
This color scheme is adorable! You could do it to match anything including a grinch theme. Super cute idea!!
I love christmas lights! I’m going to try this project.
Love making signs and have to try and make some soon ! I added some cute things to a gingerbread sign i bought at Ross and loved the new makeover. You just have to think outside the box!!!
I have your scrapbook paper and these lights and looking forward to doing something with them. I have done paint in ornaments before and love how they came out on this one.
Going to do this year I wanted to do this last year with the grandbabes and life got busy
This is one of my favorites ❤ ????
I had clear plastic ball ornaments , I put white paint inside and let dry and added all the reindeer names on them. This is a Kool project. Kids would love it.
I love this. She depth really makes the bulbs pop!
Love the colors.. this is so pretty..
When I saw this on your blog the first time, I actually had just bought some wooden Christmas Bulbs and made the exact same craft with just wooden ornaments!! Still decorate with it today!
This is one of my favorite crafts for christmas or could be used for parties,etc. Would never thought to do this. Love all the colors you choose. Unique idea.
So creative!
This project was so cute
Oh it screams Brooke. I really love how this comes together. You chose the perfect palette for your style. A favorite for sure
Love all of your projects. Thanks for sharing
This is such a cute idea! I absolutely love the colors that you chose.
This turned out adorable
I love the paint inside the bulbs! Can’t wait to try that with some round glass ornaments I have! I might try to swirl two colors inside them!
I love this! The big light bulbs are so cute!
Such a cute and creative idea. Great job!!
This is beautiful! I love Christmas light bulbs, doesn’t matter what source, they’re all so pretty!
Love the bulbs….hadn’t thought of putting the paint inside…thanks!
I really like the “non-traditional” colors!! Such a cute and simple project. It turned out great!
One of my favorites of yours!
Going to give this one a try! Love it!
I love the colors you used, not the traditional Christmas colors. This turned out super cute & I think I’m trying this one too!❤️????
This is adorable. It’s so simple and attainable. I can’t wait to go get My supplies so I can make myself one. ????
I love the choice of colors.
Another cute idea that you could choose what you like color wise and make it your own! You are so creative!
Lve this idea with choosing my colors and how it is 3-D
You always have the best ideas and inspire me with your creativity! You are blessed with being creative!
So creative and I love these colors!!
Love the whimsical look! And the non traditional Christmas colors on this!
Love this!
I’m gonna try this! So cute!!❤️
I have some of the light bulb ornaments and will have to try this. Love the colors you used! So cute and festive!????
I really like this one using Christmas Bulbs.
I have some bulbs that I’m going to make a tree using them.
Beautiful idea, Brooke!
I would love to win the Christmas Tree!
I appreciate you considering me.
Thank you!
Adorable!
Your ability to think outside the box is amaaazing!
So so cute!!
I love this one Brooke! So whimsical!!!
This is so cute! Love the colors
This is so whimsical and cute. I need to make a trip to the craft store tomorrow.
I like the colors you picked. I could also see.making a garland out of these for.a.mantle. Very cool ides.
I love the painted Christmas bulbs better than filling them with sand. The paint colors you used are amazing!
This is such a fun idea!!
I love a classic red and green Christmas, but it sure is fun playing with new colors. for Christmas.
This is the cutest sign ever????
I remember this one too! So cute and colorful! I have your spindles from your garage sale proudly displayed in my living room! Can’t wait to decorate for Christmas. Would love to have the new viral tree to decorate. Good luck to all!!!
Love this. I’m so ready to get all my Christmas decor out.
Love it!
Cute idea.
I really like this idea. Looks like so much fun to do with the kids. Another great craft
Such a CUTE, whimsical Christmas display piece! I love the non- traditional colors used!
And the grandkids can help with this one! Cute!
I love this idea. I might add a pair of elf legs and wrap some around a foot so they look like he got in them. Thank you for the inspiration.
Love Hobby Lobby and how this turned out!
Super cute, I usually use vintage and antique ornaments.
I love 3-d art! You’ve done it again. Love this project.
Very creative I love it.
Such a cute idea!
How original! I need to do this one! ❤️❤️
Love this idea! Super cute.
So original, looks so cute!
This is probably the most creative thing I have seen! Would love to do this with my kids. I love it! Thanks Brooke❤️
Love the paint hack would be an easy craft for the kiddos I watch. This pic you made is really cute
I have extra lights I saved for a project just like this. Great idea!
Another very cute project!
So cute! Love the colors!
I have some some old farmhouse pictures I decorate with. Instead of purchasing new I attach seasonal “pictures” to them with magnets and change them out. This is a cute idea for that! I’ll have to give it a try!
So stinkin cute!
So many options for this one! Great and beautiful inspiration! Love your blogs!
Wonderful idea. My wife really like the shape of these bulbs. Very vintage looking. We love trying to create together for our family. Especially on a budget. Thanks!
I’m going to try this. It’s so cool
I love the old fashioned Christmas lights, reminds me of Christmas as a little girl! ????????????
Love Christmas lights. How fun is this?!
I wouldn’t have thought to paint the bulbs. I wish my mind was as creative as yours. Cute project!
So fun n festive! Definitely gonna have to give this a try. I am going to do something similar like this for a diy decoration of a gift giving Christmas gift n I can’t wait to see how it turns out. Love this Brooke
That would be fun to do with kids ! So cute !
Awesome!
Texas home Christmas tree
Great idea for the light ornaments! Definitely have to try my hand at these!
Loves this! I love the colors. My daughter actually wants to try this so here comes the craft night!
Great craft project.i would to make this
This is so cute, I’m getting the supplies right now to make this cute sign.
This is so neat. You come up with the cutest things.
I always wait until after Thanksgiving to put up my tree and decorate for Christmas, bit all your great ideas make me want to start now!
I do need to make this reminds me of the Christmas lights we had when I was a kid
cute ideals. love to watch your blogs
So cute,great idea ‘s you have.
Great project! I would not have thought of that! Looks cute!
Gosh I just love this one!! Gonna try to do it with my grandkids!! It’s just so pretty!!
This looks so cute! Will have to definitely try it!
This would make such an awesome teacher gift! I love it!
Love it ! And entering to win Christmas tree
I l9ve the colors
Love this!!!
This one is cute, too. I might choose different colors, but I like this.
This is such a cute idea and pretty!
Love the colors!
Too cute!! Definitely gonna try this
I love lights! This is so cute!
Very very cool and a real original ! Love it !!
So cute
So cute! I love the colors you chose!
I really like the colors you chose for the bulbs so pretty.
.
I love the colors! So cute!!
How adorable is this! I’m all over it. Thanks for sharing your creativity.
Thank you for sparking creativity
Love all your ideas for Christmas
Such a cute idea!!!!
I have some picks from Wal-Mart last year that could be used for a project like this… hmmm. I see a project in my future.
So cute!!!
I LOVE this one so much!! Thanks for sharing!
This is another one I want to try!!! Very cute!!
Another perfect project for Arts & crafts at the nursing home!!!
I remember watching you make this. I LOVE those pastel colored bulbs!
I love the pink and aqua colors you used in this project – they make me happy! Thanks for sharing your amazing talent with us!!
This is one of my favorite crafts you’ve done! Looks like it belongs in Whoville!
I love this! Great colors!
Would be so neat if there was a way to incorporate battery operated lights into them somehow! But I love this it’s so cute and could be done in so many colors/ways!
So fun! I would love to try this!
I LOVE this one. So cute!!!
So super cute! Love this! ????????????????
How fun and unique!
Love the colors!
God is good!
I think this would be an amazing project for my students as a parent gift
Love love love the colors !
This turned out so pretty. I am doing gifts with some. Thanks
I love the 3D effect! I never thought about how to paint light bulbs.
Love, Love, Live this light sign so much. The colors are beautiful. Instructions are easy to follow and a really fun project.
That is so whimsical I just love it!
Love this idea!
Great idea!
Love the painting idea, I could see these hung on a Christmas Tree.
Cute idea’
I hope I win the beautiful tree. This project is beautiful as well.
I love the colors you chose! So bright and cheery!! Perfect for the holiday season! I want to make it now!
I have done the paint in the ornaments but never thought to put them on a sign! So cute!!!
Love seeing your whimsical craft ideas.
This turned out great. I love colors and how it looks vintage!
I love these colors! So cute!
Absolutely adorable. Love the color scheme! Thank you for inspiring us to be creative! ????
Cute idea
So simple and easy but FUN!
This is so adorable. It’s an original, because I haven’t seen this before. Thanks for sharing! ????
Very cute and different
So stinkin cute. Love it, love the colors.
Super cute idea, grandkids could help with this one.
I think I could get my kiddos in on this idea. It could be cool to see how they put this together.
I need to get some of these light blubs now! I love these colors but I think i would use the traditional Christmas colors.
Super cute! Love that you used colors other than red and green!
Gonna try this with the grandkids!
Love this!
So fun and festive! I love this
I see a Hobby Lobby trip coming up. So cute
This is so cute!
So cute!
I like the colors you used. I have been swirling paint in Christmas balls and making pretty ornaments
Super cute! Love that it’s not the traditional style!
Such an adorable project!! Easy but with a wow factor! A must try!!
Great project for girls night. Thank you
So cute, love it!
So festive! I’ve never tried to paint ornaments bulbs before but I’ve always wanted to try. My niece would love this project. Totally her colors.
Oh my gosh, I love this idea and the colors!! ❤️
Such an amazing idea! I love the bright colors! I’m going to try it in red, green and white! Thanks for always inspiring us!
Love this!
Love this !!
I think I have some of those ornaments! Where or where is the problem. I tend collect, hoard, ???? items to use, but never get to the craft. I need to work on that.
I bought these last year but didn’t know what to do with them…thank you for sharing.
So cute and colorful!
Very creative I’ve always wanted to do that with the paints I’ve never done it I see it all the time and love it especially when you can choose the colors that you’re going to put even for an ornament it’s easier to find the paint right idea
Love this!!
Super cute! This would be a fun project to do with my 6 year old grandson!
I need a trip to hobby lobby what a cute idea.
I love that you have included pink in this because I am a pink girl, and I love to incorporate it whenever I can!
Great idea
I am in the mood to decorate for Christmas after seeing all these great Christmas ideas. Those little bulbs are just too cute! I think I will do this craft with my grand daughters, they will love it!
Thanks Brooke
This would be good for a teen party to do. It’s easy and cute.
Turned out so cute!!
I probably would not have thought to use these paint colors for a Christmas craft. I like that you make me think outside the box.
SUPER CUTE FUN IDEA
Cute! Thanks for the inspiration!
Such a fun and easy project. Id love to do this with my Granddaughter. She is 6. She always tells her mom that she can’t throw things away because you can craft with them lol. This would be a great project to do.
This gives me an idea for a craft with my older grandchildren. ????????
I’m not crafty, but your instructions has me wanting to try this.
I don’t remember seeing this post before now! This is such a cute craft that even kids could make as gifts! Super cute!
Great project for the grandkids!
So cute!! Simple, but packs a punch
What a cute idea to use those for! Might have to try this!
So cute! I have been saving some old color light bulbs that would be great to use in this project!!
This would be a good craft to do with my granddaughters
Love love love it. So colorful. Great work.
Super cute!
I made something very similar to this a few years ago but mine wasn’t near as cute as yours lol.
So pretty. I did the one with paint color samples. This adds demention
This is adorable & unique, love it ????
Such a cute idea!
Hi Brooke! I love the colors of this project! Just what Christmas should be….colorful and cheerful! (IMHO ????❤️???? I love your whimsical style when it comes to this kind of project. This is sure to fit anywhere you need some color and fun!! God’s blessings!! ❤️❤️❤️
This was one of the first crafts of yours I created years ago. It turned out great. It’s still one of my favorites!!!
One of the first crafts of yours I made. Still one of my favs. ❤️
So cute ! My granddaughter would love this ❤️
Absolutely adorable!!
Super cute!!
Love the colors
Love ❤️ it!
Love this!
I wanted to make last year with my grandkids but time got away from me so definitely making this this year
So fun! Love this!
Those colors are perfect for a little girls room! Grea5 idea again for a project that you can include the kiddos in. Adding those cute bulbes to the hobby lobby list,,
What a colorful and creative little sign. How fun.
Love the colors you used. A cute idea. Going to try this myself this Christmas and make a few for my family as well.
Cute inexpensive office door sign. A nice touch and once again, not an arm and a leg!!!
Adorable! I love all your crafts! You have the best ideas!!
Love love love this! I need to do this one. It reminds me of the light project you did using the paint swatches when you were still in your trailer. That was one of my favorites!!
Love the idea!! So simple but beautiful. I’m gonna have to make a trip to Hobby Lobby!! Thanks for the idea!!
So cute!! I’m always looking for a reason to go to Hobby Lobby and you just gave me one! ????????
One of my favorites!!!
This Christmas craft is one of my all-time favorites! I bought the materials to make this and have made a few of them as gifts also!
Your upgrades will never cease to amaze me!
I painted something like this a few years back, and someone in my family loved it so much I gave it to the as a gift the next year!
Adorable! I think I will make this with my grandsons. They love to do crafts, they would love this!
I am totally trying this!! How stinking cute!!
Another good one ! I actually do the same thing to make grinch ornaments for craft shows and personalize them with my Cricut .
Gonna need to make these!! How adorable would these be as an addition to a hand made Christmas garland banner! Especially if you are without an outlet I ❤️????!!
I picked up some of these bulbs last year. Now to find them and give this a whirl! Absolutely love the colors you did!! Can’t wait to try!!! ????
I just love this sign, especially the colors used. It’s so fresh looking and just enough of a pop of color to go with a red and white decor theme.
Absolutely in love with the colors you chose and the Candyland theme! Great idea for all ages, thanks again for sharing your awesome imagination! ????????
This is too cute!! I watched a live when you made this one!!
Love the colors!
** Great idea & now I know what to do with the lights I bought**
Love this idea
I did glitter in the round ones and personalized them with vinyl using my silhouette cameo.
Love it
Love the colors❤️
So stinkin cute!
Super Cute!!! You are so talented!! Thank you for sharing!!
The tagled light DIY was cute. I like how you didn’t use the traditional Christmas colors on the lights! I liked the sign just fine until you put your Brooke stamp on it!!!
Cute idea. Love the colors
This is so cute. Think it would be wonderful to do with the grandchildren. You can change up the colors to match your own theme
That’s such a cute idea that can be personalized in so many ways!
Very whimsy and colorful!
How do you keep coming up with such great and unique ideas?! Fabulous! ????❤️????
So simple and so cute! Love ❤️
So cute! I think I may add a large tulle bow to the top of mine!
Love it, Love it!
So cute! You are so creative!
This project is on my to do list! Great ideas everytime.
I so want to make something similar to this! Thanks for the inspiration!
Love this draft. So cute.
Inspirational and simple! My kind of craft project!
Great idea and fingers crossed for the tree ???? giveaway ! So sweet and good luck everybody!
The pastel colors give this project such a whimsical look!
This is probably one of my favorites! I love the colors!!!
so cute!
This is adorable!! I think I wanna try it. ???? love it
I could do this with my young granddaughters. It’s endless on the materials that could be used inside the bulbs. Thanks again for sharing your craftiness! ❤️
Too cute! and love that you can change up the colors as needed. I have not ever used the paint inside, but seems like now is a great time to try this!
Never done the paint inside of bulbs. Sounds like a good thing to try out! Love that I can make the colors work for me. Thanks again for sharing!
I remember this one being one of my favorites. Love the whimsical colors and creative border. So dang cute!
CUTE! CUTE! CUTE!
This is one of my all time favorites!! Plus the colors are really fun…
Great ideas
This is my favorite one I love it,
There is just something about Christmas light bulbs that get me excited for Christmas!! I love this easy and cute craft! Especially the colors!
So cute! Would love to make this.
This is so cute! I love the colors you picked for the bulbs!
That is so cute!
I need to do this with my granddaughter !!
Love it!
love the idea of filling bulbs with paint; a very neat idea.
I love the colors! I think I will need to get some clear bulbs and do this for garland for my gingerbread tree. Thanks for the inspiration!
Love the color choice! So cute!
What a great way to use other colors you can make this to match any color you want to use!
Great idea! You could do any color to match your own theme!
Love this! I’ve done the glitter ornaments but not paint. May have to give it a try!
I’m definitely trying this. Love it!
Love these ornaments- wil be trying to make some.
Would love the tree – it’s beautiful.
So cute!
Adorable! And fun
Great and simple idea and the color choice you can do with this
I love the sign you used and the scrapbook paper pulled the whole craft together with the colors of the bulbs. Love, love, love it!!! ❤️ ???? ???? ????
Another great project for the grands! Love this!
So cute!! Love it!!
I wish I hadn’t thrown out my set of vintage lights., this is really cute!
Very creative! Love it!!
LOVE LOVE LOVE the color combination!! What a cute and clever idea- I think the process of swirling paint in the inside would be quite relaxing!
That is simply adorable.
Love the colors! I painted some clear ball ornaments like that last year. So fun!
Cute.. cute.. cute! So many things you can do with the bulbs!
Love! I may need to try a garland out if these!
I love the big lights. They remind me of my childhood. This is such a fun idea to do this Christmas with my grand daughters. Thanks for sharing!
love the lights. such a cute and whimsical idea
So cute! I love the colors too. I will definitely have to try this project. ♥️
Yup…soooo cute and one of my faves so far!
So neat! Love all of your ideas!!!♥️♥️♥️
So creative ???? love your ideas.
What a fun project for Christmas!
This would be a fun project to do with my grandbabies.
Cute! I would definitely make this.
This is sooooo adorable!!!
Another amazing idea!!!
Cute colors!
Fun craft for all ages.
So stinkn cute. Again, I love the colors together. So festive. ????
Very cute!
Such a cute idea, you are so creative !!
Awesome, love it.
Super cute idea…
Cute idea!
This would be favorite craft yet. Love it.
Adorable and SO festive!!!????
I love the colors you chose.
Love this!
Love this
Love this. I think maybe use the lighted necklace. Will try with the grandbabies and see if it will work. Thanks
So cute!!!! I’ve never used these bulbs but they’ll definitely be put on my crafting shopping list!!
I love this, got the stuff to make it!
This looks fun!! ???? I like it!!
I want to try this project. It looks so easy watching you do it. I am going to make a huge mess when painting the bulbs. We will see.
This is so cute! I love how creative you are, especially when it comes to your color choices!
Too cute! Those lights would be cute as garland also! ????????????????????????
Another cute idea. Love how easy it is to paint the bulbs.
I absolutely love this one, so adorable ❤️
I remember this ! And you can do any color to fit with the color scheme you want! And who doesn’t have tangled lights?!
Cute!
Love painting the bulbs! Great idea!
So creative! It’s so cute!
I’m going to try this
Luv this idea and colors you used…I’m going to try this for Christmas this year…thanks for sharing
I have been saving larger Christmas light bulbs that burn out to repurpose. I plan on cleaning them and spray paint the traditional colors for a wreath.
you are such crafty lady this is so cute
love this idea
! Super cute! And I love the paint inside the bulb so it won’t scratch. Love the sign.
This looks like lots of fun with my grandkids. I have collected all of the needed supplies plus a few packs of small vinyl letters so, after our “Tangled Lights” project is complete with just enough bulb for each letter of their name we can personalize for each grandchild =)
Great idea! Super cute!
This one here “Tangled Christmas Lights” will be the project for me and my grandchildren for this year for our Thanksgiving Christmas craft. I have made a list for all the items and also purchased a few packs of small vinyl letters. I will have each grandchild personalize this one ~ one letter for bulb to spell out their names =)
I can’t even with this one. Oh my gracious. Absolutely adorable. You have got me wanting to make a hobby lobby …..dollar general run today. I love ALL of these great ideas. ❤️❤️❤️❤️❤️
Cute project for girls night.
Love 3-D pictures
So cute!
absolutely adorab;e!
Love these cute bulbs! And the colors!
I see why this is one of your favorites to date. It’s so cute and accurately depicts christmas. ????
So so so cute!!
Love the bulbs and the colors you chose
How adorable, will have to do this project with my grandbabies.
So colorful! I just happen to have a few bags of these ornaments in my craft stash. I will have to craft something similar! Thanks Brooke!
Thank you for sharing your talents.
Gonna do this! Adorable
Wow! Turned out so cute! I remember this one!
So cute! Love this
I love those bulbs & the color choices you made. And I’d really like to win that tree. (I don’t currently have a tree & I’d really like to put it in my classroom.)
I have picked up those clear bulbs in the craft store many times and tried to think of craft ideas for them. This is so cute!! Love it!
So cute love the colors
This is really cute. I have a box full of these lights that I can use.
I can’t wait To make this one with my grandkids, they are going to love making it!
This is adorable!!
Oooohhhh! You’ve inspired so many ideas with these lights!!! ❤️
Just found me some clear bulb weekend project here I come!!
Just found me some bulb … weekend project here I came
Fun. Simple cute
Love these colors!
Soooo cute!!!!!
Cute project for my granddaughter and I. Love the colors too.
I think I need those bulbs for a table setting!
Going to give this a try this weekend!
I wish I had half of the great ideas you come up with. So cute!!
Love this idea, it’s beautiful
So talented and creative! Thanks for inspiring me to be creative and think outside the box!
What a cute whimsical craft!!
Cute! My granddaughter would love to do this for her room.
My granddaughter would love to do this for her room. Cute
I made this project and love it! So cute and fun!
Oooh! I like this! I did make the one with the felted bulbs and loved it. I’m going to have to copy this one also.
Oooh! I like this! I did make the one with the felted bulbs.
So creative. Love this.
I can always count on you for inspiration and ideas. Thank you Brooke. I love this.
Thank you Brooke. I love this.
My favorite.
This one takes me back….I’m old lol
So so cute!! I remember watching this when you made it! I absolutely love it!! So cute and creative!!
I love the paint technique you used with these clear bulbs. Painted bulbs like this could be used in so many different projects. I think I’m going to use this technique to make a garland of bulbs. Love your creativity! ????
I love your ideas, this is adorable!
I love that you can do this in any color combo. This one is so retro and cute????????
Love this!
This is super cute.
This is super cute. I can see this in my daughter’s home. I’ll have to show her this post.
I’m going to pick up some clear bulbs.
I’ve got bunches of vintage bulbs like that- need to start working with them! Thanks for the idea.
Whimsical.
Whimsical.
OMGoodness! So whimsical.
I loved how this turned out! Such a great idea!
This is so cute! It would be a fun project for my daughter to help with!
Such a “bright” idea!! Love it!
(Running downstairs to grab these exact ornaments and craft a cute sign!!)
Yay! I’m so glad you’re going to make one!
This project is amazing! I love the raspberry, pink and teal colors you used on the light bulbs!!!????????????
Thank you!